Now, you have created your resource, took it through the steps to flatten it and secure it (or encrypted it), and you've written detail instructions on how to implement the lesson and resource in a stranger's classroom. But. You want to make sure your product, among the hundreds or thousands that are of a similar nature, gets noticed. You ask yourself, "Self (after all, what else would you call yourself?), what attracted you to that resource you bought online?"
And self answers, saying, "That professional, colorful, and well-balanced cover, of course. And when I went to check it out, there were these thumbnails that gave me more visuals. And then I read the description, and just knew that I had to have it."
And you think...of course. A cover. And those thumbnails were a good idea...
Wait a minute. Didn't the guy writing this blog mention something about covers and thumbnails way back in Part 3, around step 12? I was kind of in a rush so I didn't really pay attention to it...
To which the guy writing this blog replies, "Why, yes. Yes, I did mention it in Part 3, Step 12. In detail. Would you like me to go over it again?'
So, by actual request from K, a new teacher-author-turning-entrepreneur on Facebook, here we go. The step-by-step for thc creation of covers and thumbnails (henceforth called thumbs).

 Step 3: Select a background color for your product cover. I enjoy using a gradient and playing with combinations, but for this one let's stay fairly basic. This is also in the Design tab, but under "Format Background", then select gradient fill.
 Step 4: Now we are going to put in a text box. Click the Home tab, insert the text box, and type in your title. Remember that you want the font to be easily readable, so probably NOT a calligraphy or bubble-type font (although some do work!). For this cover and thumb set, I am using KG Talking to the Moon, which I purchased from Kimberly Geswein Fonts. This is in a 54-point font size. You want your product name to take up 1/4 to 1/2 of the cover, measuring from the top.
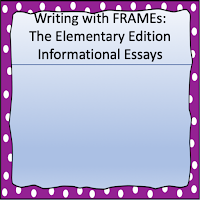 Step 5: Next, we are going to add a border. Usually, I don't get all cutesy with my borders, as I am generally creating for secondary teachers, and we secondary teachers take ourselves way to serious for cutesy. However, the targeted demographic for this product is the elementary grade teacher, and cutesy works in elementary! This particular border is a frame from Charlotte's Clips.
 Step 6 is to add a little clipart. You want your clipart to reflect your target buyers' STUDENTS. Get them to kind of make a connection, however, still be fun. I like using cartoon drawing, in this case one of the elementary kids from Melonheadz. I use the artwork in this series for all of our "Elementary Edition" line. Here I am going to duplicate the slide 3 times, then come back to slide 1. These extras are going to become our thumbs.
 Step 7 NOTE: Now we are going to use some of graphics of our product. In this case, we are creating for a series of pages containing text. Before we get completely into the pages on the cover, I want to demonstrate one of the things we are going to be doing. Here I have added a PNG image of one of the sheets that is an addition to the product. Notice that it kind of blends in, It doesn't stand out.
 So, with the format background section of the design tab open, we are going to left click on our sheet/PNG/image. With it selected, we are going to select "Fill & Line" on the format picture pane. Now select "Line", then "Solid Line". Next, go to the "width" drop down, and begin clicking the up arrow. I have set this one to a 2 pt width. Notice to the left how this now "pops" out?
 Step 7: Now we are going to grab the PNGs we created of our resource and/or resource pages and begin layering them on the cover. I begin with the last page first, so that I can layer the first page on the top when I am done. Notice that right now I am not entirely concerned with positioning of pages.
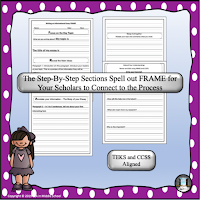
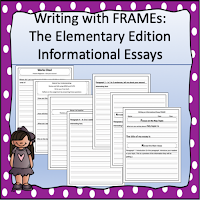 Step 8: Next we position the pages in the order and position we want them in for our final cover. When we position them, we then right click anywhere on the cover and select "Reorder Overlapping Objects". This will bring up a 3 dimensional layering of everything on our cover. Layer these in the order you want. Notice that none of the pages are extending over my border frame, but I do have the girl over the frame.
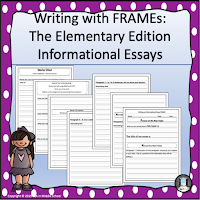 Step 9: Add our logo and the copyright statement to the cover. As I mentioned in an earlier post (you know, Step 12 of Part 3 of Becoming a Teacher-Author Entrepreneur), I always put my logo in the lower right hand corner of my covers, thumbs, and preview pages. For this frame, I insert a textbox in the lower left, select a light gray text color, and add my copyright. Position-wise, with the textbox visible, the girl is standing on the top of the textbox. Now, highlight the textbox and the logo together, right click, select copy, then paste them onto the other "blank slides". If you take a look to the right, this would be a very acceptable cover! the product is displayed in a manner that tells prospective buyers what they are getting, and it cannot be stolen!
 Step 10: In this case, I am adding a little box to tell teachers that I have included teachers' notes and a student sample.
 Step 11: On my other "blank" slides, I am going to better display my product, but to "secure" it from being copied, I am adding "buttons" over the top that also give selling points for the resource...
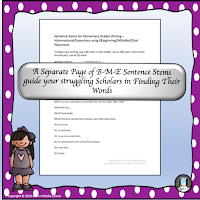 ... and on the last page I am displaying the little "extra", in this case the Beginning/Middle/End Sentence Stems sheet that I included.
Becoming a Teacher-Author Entrepreneur Steps 1 and 2
Becoming a Teacher-Author Entrepreneur Step 3 - Creating a Secure Product
Becoming a Teacher-Author Entrepreneur Step 4 - Creating with Encryption
Becoming a Teacher-Author Entrepreneur Step 5 - Editable vs. Non-Editable
Becoming a Teacher-Author Entrepreneur Part 7 - Pricing and Tax Categories
Guest Blog - SEO for Teacher Sellers
Becoming a Teacher-Author Entrepreneur Step 8 - Using Graphic Elements in Products
And self answers, saying, "That professional, colorful, and well-balanced cover, of course. And when I went to check it out, there were these thumbnails that gave me more visuals. And then I read the description, and just knew that I had to have it."
And you think...of course. A cover. And those thumbnails were a good idea...
Wait a minute. Didn't the guy writing this blog mention something about covers and thumbnails way back in Part 3, around step 12? I was kind of in a rush so I didn't really pay attention to it...
To which the guy writing this blog replies, "Why, yes. Yes, I did mention it in Part 3, Step 12. In detail. Would you like me to go over it again?'
So, by actual request from K, a new teacher-author-turning-entrepreneur on Facebook, here we go. The step-by-step for thc creation of covers and thumbnails (henceforth called thumbs).
Creating Covers and Thumbs - a Step-by-Step with Slide PNGs
Okay, so the use of covers is important for one reason only - to grab the attention of the perspective customer and stop them from swiping left on your product. I am actually being literal with that, as most customers will see our products on their phones first, and so we REALLY want to make them pause. For this lesson, we will walk through how I created the cover and thumbs for our "Writing with FRAMEs The Elementary Edition: Informational Essays".
Step 1: Make sure you have a PNG of your logo ready to go, otherwise you will be updating covers for a while!
Step 2: Open a new PowerPoint or Google Slides and create a custom sized slide. With PPT this is done using the Design tab, then the Slide Size drop down, then Page Setup. I do not know in Slides, so from here forward we will only be using the PPT option. When you have it Slide Size open, select the "slide sized for" drop down and choose Custom. Set the numerical values to 10 in. for both height and width. You will then apply it and have a slide that looks like a blank white square.
NOTE: If you are using Google Slides, follow this for slide size set up: 1) Open new Presentation; 2) Click "FILE" then "Page Setup"; 3) Select "Custom"' Change size to 10x10 inches; 5) Apply
 Step 3: Select a background color for your product cover. I enjoy using a gradient and playing with combinations, but for this one let's stay fairly basic. This is also in the Design tab, but under "Format Background", then select gradient fill.
 Step 4: Now we are going to put in a text box. Click the Home tab, insert the text box, and type in your title. Remember that you want the font to be easily readable, so probably NOT a calligraphy or bubble-type font (although some do work!). For this cover and thumb set, I am using KG Talking to the Moon, which I purchased from Kimberly Geswein Fonts. This is in a 54-point font size. You want your product name to take up 1/4 to 1/2 of the cover, measuring from the top.
 Step 5: Next, we are going to add a border. Usually, I don't get all cutesy with my borders, as I am generally creating for secondary teachers, and we secondary teachers take ourselves way to serious for cutesy. However, the targeted demographic for this product is the elementary grade teacher, and cutesy works in elementary! This particular border is a frame from Charlotte's Clips.
 Step 7 NOTE: Now we are going to use some of graphics of our product. In this case, we are creating for a series of pages containing text. Before we get completely into the pages on the cover, I want to demonstrate one of the things we are going to be doing. Here I have added a PNG image of one of the sheets that is an addition to the product. Notice that it kind of blends in, It doesn't stand out.
 Step 7: Now we are going to grab the PNGs we created of our resource and/or resource pages and begin layering them on the cover. I begin with the last page first, so that I can layer the first page on the top when I am done. Notice that right now I am not entirely concerned with positioning of pages.
 Step 8: Next we position the pages in the order and position we want them in for our final cover. When we position them, we then right click anywhere on the cover and select "Reorder Overlapping Objects". This will bring up a 3 dimensional layering of everything on our cover. Layer these in the order you want. Notice that none of the pages are extending over my border frame, but I do have the girl over the frame.
 Step 9: Add our logo and the copyright statement to the cover. As I mentioned in an earlier post (you know, Step 12 of Part 3 of Becoming a Teacher-Author Entrepreneur), I always put my logo in the lower right hand corner of my covers, thumbs, and preview pages. For this frame, I insert a textbox in the lower left, select a light gray text color, and add my copyright. Position-wise, with the textbox visible, the girl is standing on the top of the textbox. Now, highlight the textbox and the logo together, right click, select copy, then paste them onto the other "blank slides". If you take a look to the right, this would be a very acceptable cover! the product is displayed in a manner that tells prospective buyers what they are getting, and it cannot be stolen!
 Step 11: On my other "blank" slides, I am going to better display my product, but to "secure" it from being copied, I am adding "buttons" over the top that also give selling points for the resource...
 ... and on the last page I am displaying the little "extra", in this case the Beginning/Middle/End Sentence Stems sheet that I included.
Step 12: All that is left now is to export our slides as PNGs or JPEGs! And we are ready to upload to our platform with the product!
 |
| Writing with FRAMES the Elementary Edition: Informational Essays |
Final Thoughts
Two things to consider here: first, make a second copy of the PPT you just created and rename it "Editable Cover and Thumbs" and save it in a separate file; second, always work from that new editable copy for future covers. There are a couple of reasons for this. First, why reinvent the wheel every time you create a new resource? You can simply go in and change the title, product images, and graphic elements. Second, if you maintain the graphic elements, you are "branding" your resources and products. Suzanne and I change ours up, but keep specific, recognizable features. All of our Elementary Editions, for example, look similar to this one.
Please leave a note in the comments section letting me know if you found this helpful or not. Also, if you, like K, have an area you would like specific information about, let us know! If we don't have the answer, we know people who do!
Follow the links below to the other posts in this series!
Becoming a Teacher-Author Entrepreneur Step 3 - Creating a Secure Product
Becoming a Teacher-Author Entrepreneur Step 4 - Creating with Encryption
Becoming a Teacher-Author Entrepreneur Step 5 - Editable vs. Non-Editable
Becoming a Teacher-Author Entrepreneur Part 7 - Pricing and Tax Categories
Guest Blog - SEO for Teacher Sellers
Becoming a Teacher-Author Entrepreneur Step 8 - Using Graphic Elements in Products
THIS IS GENIUS - I am BRAND NEW to Teachers Pay Teachers - my store is: https://www.teacherspayteachers.com/Store/Learning-Through-Literacy I've got A LOT to learn from you! Going to start at step 1....
ReplyDeleteThank you, Amber, and welcome to the journey! You're going to do fantastic!
ReplyDelete