The Nuts and Bolts of Product Creation, or, "Flattened? It's a sheet of paper, of course it's flattened!"
| Custom Logos from Busy Little Bees |
A word of caution here. Canva, Office, and most other creation platforms, including Bitmoji, generally have something like the following statement somewhere in their Terms of Use (ToU): "Products created without the purchase of (Insert their name here) professional (or commercial) may not be used for any commercial purposes. Doing so is a violation of our Terms of Use and copyright." So, if you are going to create your own logo, either use a professional/commercial form of the program; draw, sketch, or design your own freehanded and scan it into your computer; or, hire one of the many talented artists and logo creators online. Chances are you could find one on the platform you have decided to sell on! Great way to check out the experience for the buyers - YOUR FUTURE CUSTOMERS!
Building a Product from a Lesson or Lesson Plan
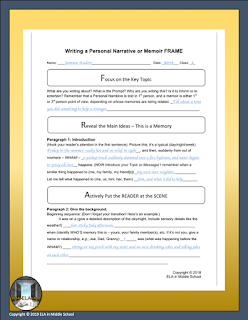
In order to make this process as easy as possible, I would like you to select one of your favorite lessons you created during the past year. In order to make this as cheap as possible for you to get started, I am going to begin by going through all the steps as if you do NOT have Adobe PRO or similar PDF maker with encryption capabilities. If you have the Adobe Pro, which I highly recommend, skip to the next blog post entitled "Creating Products When You Have Encryption Available". As I go through this, I will refer to one of our products, our first one, Writing with FRAMEs: Personal Narrative or Memoir. This product began as a single sheet, double sided, Google Doc created in Drive. In the process of making it work for others, it became 14 pages (actual 7 page PDF and 7 slide PPT) PLUS Teacher Notes and ToU - more on these later. I will refer to the product as "our FRAME" or "the FRAME" for the purposes of this tutorial.
You have your first lesson and the sheet or material that you created to support the lesson. Fantastic! When Beth, Suzanne's sister, sat there and walked me through this the first time, it literally took me 2 hours to decide on what lesson and material to turn into a product first. Finally, in an attempt to get me away from her parents dining room table I am sure, Suzanne said, "What about that writing FRAME you made for your kids last year to help them write a personal narrative." Ding-ding-ding, and they're off! From that point, here is what I do.
Creating a Product When You Do Not Have Encryption Available, or How to Transform Your Awesome Work for your Class int a Digital Product People Will Pay For
Develop the product. Take the created material, sheet, pages, whatever you made, and turn it into a PowerPoint (PPT) or Slide Presentation. I create everything in either PPT or doc now, usually PPT because docs often end up in the PPT anyway. I also create everything EXCEPT word puzzles in a format that can be used electronically, and often using a whiteboard or Promethium board.
Step 1. Create a product file. Give the file the same name as your product. Everything you save as we create will be saved into this file. This is your Base File.
Step 2. If you are using doc, put every page on a PPT. Go to PowerPoint, and open a new presentation. Go to "Design" (3 to the right of "Home") and open that tab. Select "Slide Size (3rd from the right side of the menu bar). Click the drop down, and open "Page Setup". Now, click the drop down for "Slide sized for" and select "Custom". Here I always use an 8 1/2 inch wide by 11 inch high slide - the same as a sheet of paper. I am more comfortable working with this. Use what is best for you AND your final product. Save this and name it "(Product Name) Draft".
Step 3. Determine what will be editable and what you do NOT want people to be able to change.
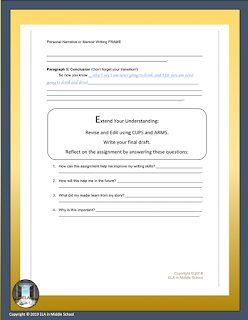
Step 4. You are going to either copy and paste everything from your original document (assuming it is in a digital format), or you are going to transcribe everything you need from the original to the slide(s). Do this in sections with seperate text boxes. Now, make note of where the material you do NOT want to be editable falls. You now have a rough idea of what you want to make editable. With the FRAMEs, this went from 2 pages to 7, because I was now needing to give students room to write on the form. In my own classroom, I simply had my students use the FRAME as a guide as they wrote in their journals. At the request of a customer, I made the sentence stems on the PPT editable, but not in the PDF.
Step 5. Remove everything you don't want to be permanent (this is the editable material) from your slides. You may not have anything you want editable - and that is completely okay! After you remove the editable portions, make sure that the permanent portions are in the same spots. Save this now as "(Your product name) permanent for PNGs ". NOTE: If you are using ANY CLIPART at all, put it on the slides NOW. It MUST be protected!
Step 6: On your newly saved permanent slides, you will need to add 1, and possible 2 and 3, additional items:
- Footer with your copyright statement in a gray text, generally 10 pt (YOU MUST DO THIS! THIS IS YOUR PROTECTION FROM THEFT!). To make a copyright, simply type in, without quotation marks, "Copyright (c) 2020 (Your name, or your store name)". When you do this in word or in PPT, the (c) will automatically turn into the c inside a circle;
- Also in the footer, page numbers (in PPT this can be set automatically) if you have more than 3 pages (optional, but very helpful to the customer who has a kid knock thing over....);
- And, as an option, a header with the title of the product, if appropriate.
Step 7. Save your work, with copyright, and title and page numbers if you choose, and also EXPORT ALL SLIDES AS PNGS! These will end up in a new file of only PNGs from these slides, numbered by slide. Name it "(Product Name) PNGs for slides".
Step 8. Create a new blank PPT with the same size pages as the first one. Add enough blank slides to have one for every PNG you just exported. Now follow these steps for EACH SLIDE INDIVIDUALLY:
- Select "Design", then "Format Background"
- Select "Picture or Texture"
- Click on "Picture Source - Insert"
- Find the file holding your PNGs
- On each of the new blank slides, insert the corresponding PNG and apply it to the background. DO NOT APPLY TO ALL!
- When this is complete, SAVE FILE AS "(Product Name) from PNGs". This is now your "Master file" for this product because you have "flattened" everything you want permanent. Nothing that is on these slides at this point can be removed.
Step 9. Make a copy of your master file you just secured. Name this copy "(Product Name) Editable". Now, go into the slides and add all of the editable portions of text that you took out in step 5. This is why I create in PPT. It is SO EASY to copy and paste from one PPT to another! This is why you saved everything in the file named "Draft". When ready, save as "(Product Name) for Use", or "(Product Name) Final", or whatever you want your customers to see the file as. Save this as a PPT.
Step 10. Export a PDF, and name it the same as the final PPT. This PDF is going to be editable if you do not have a way of encrypting, so make sure you flattened everything you wanted permanent.
Step 11. Now you are ready to go ahead and create the cover, thumbnails, and a preview for your product. Go to your final product PPT and open it. Export every slide as a PNG. Name this file "PNGs for Preview".
Step 12. Create a new PPT, and make the slide size 10 inches by 10 inches. Create 4 or more blank pages. Now you are going to get creative! It is time to design your cover and thumbnails for your product! Keep the following in mind:

- The title should take up 1/4 to 1/2 of the first slide;
- Use a type that is EASY TO READ
- Remember that most prospective customers see our products on cell phones first!
- Keep info buttons to a minimum on the cover.
- Use attractive color combinations and consider complimentary clipart.
- Notice that our logo is in the lower right of the cover and each of the thumbs. This is true on ALL of our products. This helps branding. Everytime a customer see that in the lower right, they know - "ELA in Middle School made this!"


- You will also notice that our copyright is on the opposite lower corner. This may be moved, depending on the rest of the cover.
- The Clip Art, in this case from Ron Leishman's Digital Toonage, is complementary to the subject matter, a student trying to figure out what to write.
- Finally, we are showing part of the product, but in a way that it cannot be copied or pirated. These "flattened" graphics come from the PNGs in our "PNGs for Preview" file
- After creating your cover and thumbs for this product, save them as "Cover and Thumbs", then export them as PNGs.


Step 13. Now you are going to create your Product Preview. Covers, thumbs, previews, and product descriptions are absolutely vital to a product's success. Think about your own shopping experiences. Do you look at the box and read the descriptions, or do you open it up and check the contents? The preview sort of allows both. Start this by creating a...you got it! PPT with a slide size of 8 1/2" x 11"! Make enough blank slides for each PNG from your "PNGs for Preview" folder PLUS 3. Here's what we'll make:


Step 14: After you have created your PPT of your Preview, save it as "Preview draft", then export it as...you got it...PNGs. Now make a new one using the PNGs on each blank page, then save as a "flattened" PDF; name it "(Product) Preview".
Step 15. Teacher Notes. Absolutely CRITICAL if you want repeat customers and not unhappy ones. Write out, in a formal letter format, step by step instructions on how you use the product in your class. Be detailed, because you want your customers to have AT LEAST as much success with your product as you did! Here's the other side of the coin, though. Be friendly, be real, be you. Be approachable.
Step 16. Combine the Teachers' Notes and the ToU into a single document. If you exported your ToU as a PNG, it can be put on a page in Word docs. Now export the combined document as a PDF.
Step 17. Create a "Product Information" Word doc. This is for your use to simplify uploading. On this document, you will list:
Now, for the good news for those who have encryption available. You have a LOT less work to do. The bad news is...that is the next installment!
Follow these links to other posts in this series!

- Cover page for your Preview. This is simple, just add your product cover PNG;
- Pages that talk about, and show, the different aspects of the product. I typically do one page per slide. WordArt is your friend - Put PREVIEW in big letters over everything!
- Competed Student Sample, if you have one available that you could scan in or copy onto a seperate PPT;
- Answer Keys, if applicable;
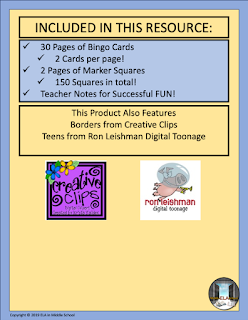
- An "Included in this resource" page that gives the number of pages, slides, types of files, teacher note and answer key info;
- A credits section. Ours says "We proudly use the following in our products" and we name borders, clipart, and original artwork, as well as where we obtained it, and a link to the site we obtained it from;
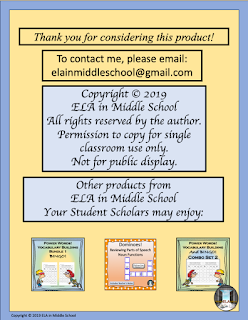
- A page that gives customers methods of contacting us and how to leave feedback on the product, as well as links to related products;
- And, finally, our Terms of Use page. Don't panic, a free one is linked below.


 |
| FREE Editable Terms of Use for Teacher Authors |
Step 15. Teacher Notes. Absolutely CRITICAL if you want repeat customers and not unhappy ones. Write out, in a formal letter format, step by step instructions on how you use the product in your class. Be detailed, because you want your customers to have AT LEAST as much success with your product as you did! Here's the other side of the coin, though. Be friendly, be real, be you. Be approachable.
Step 16. Combine the Teachers' Notes and the ToU into a single document. If you exported your ToU as a PNG, it can be put on a page in Word docs. Now export the combined document as a PDF.
Step 17. Create a "Product Information" Word doc. This is for your use to simplify uploading. On this document, you will list:
- Product Name (separate line)
- Product Price (separate line)
- DETAILED product description. You cannot give too much information here about the product, why the customer needs it, and how they are going to use it. The first paragraph needs to have your searchable keywords without being JUST keywords. Remember this above all else: it is better to tell a customer so much about the product that she or he decides it is not really what they are looking for, than it is to tell them so little they buy it expecting something else!
Step 18. The FINAL step before uploading your product. Take each final product PDF and PPT that you are going to provide the customer, and your teachers' notes and ToU, and compress all of these into one zip file. Name it..."(Product Name)". In your Base File, create a file that says "Uploads". Move the product information doc, the zip file, the cover and thumbs pngs file, and the preview pdf into here.
Now, for the good news for those who have encryption available. You have a LOT less work to do. The bad news is...that is the next installment!
Follow these links to other posts in this series!
Becoming a Teacher-Author Entrepreneur Steps 1 and 2
Becoming a Teacher-Author Entrepreneur Step 4 - Creating with Encryption
Becoming a Teacher-Author Entrepreneur Step 5 - Editable vs. Non-Editable
Becoming a Teacher-Author Entrepreneur Step 6 - Creating Covers and Thumbs
Becoming a Teacher-Author Entrepreneur Part 7 - Pricing and Tax Categories
Guest Blog - SEO for Teacher Sellers
Hi - Amber Autumn stopping by, this was a thorough post, but felt like a foreign language to me....do I NEED to make things flat? I mainly use docs/slides for items, but you refer to powerpoint solely... THANK YOU
ReplyDeleteAmber, great question, and thanks for reminding me that not everyone works in PowerPoint! To answer your question: YES! You need to flatten everything so that it cannot have copyrighted material removed. For example, if you purchased a clipart 'toon from Melonheadz or Ron Leishman on TpT, part of their Terms of Use you agreed to with the purchase is "to secure their (product/resource/clipart) from being able to be removed by other people." Think of it this way. You create a doc that has a checklist for student doing a lab. I buy that doc. I find I can remove your checklist, intact, or remove your copyright/logo/name, and I do so. I repost it on the web FREE. Or with my logo/copyright/name and sell it. We have a responsibility to protect the intellectual rights of those whose products/resources we use in our product creation, just as we want ours protected. Thanks again for the question! Sorry if I got long winded!
ReplyDelete